-40%
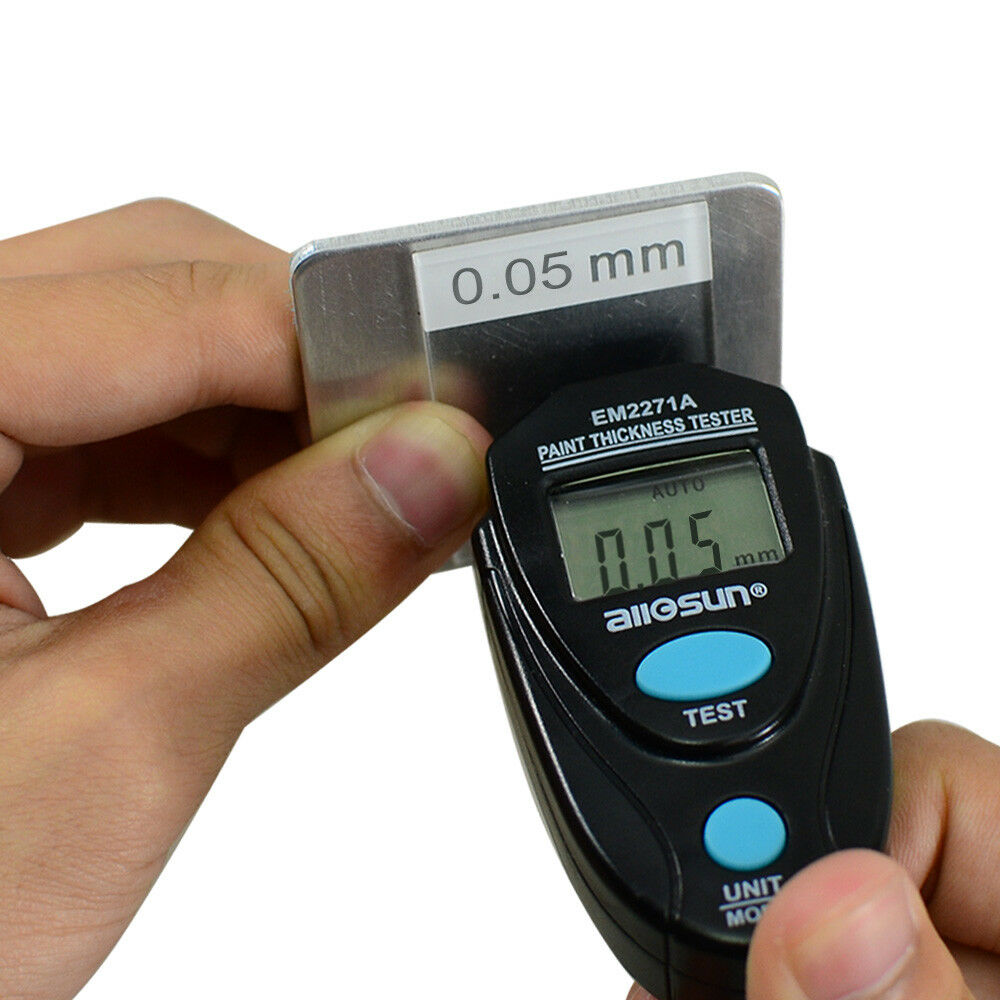
Automotive Digital Tool Car Painting Thickness Gauge Coating Tester 2.2mm/86mil
$ 11.77
- Description
- Size Guide
Description
Shop CategoryStore Home
Automotive Tester
Digital Multimeter
Digital Clamp Meter
Voltage Tester
Environment Tester
Battery Tester
Metal Detector
Pen Probe Digital Multimeter
Stud Finder
Wood Moisture Tester
Handheld Digital Scopemeter
Professional Tester
Home Meter
Netcable Tester
Other
Automotive Digital Tool Car Painting Thickness Gauge Coating Tester 2.2mm/86mil
This tester is designed to not-destructively measure the thickness of non-magnetic coatings(including paint,enamel,plastic,epoxy,etc)on iron,steel or aluminum.
Notice:
In order to obey the shipping security rules and passing the customs security check. We had put a insulation strip under the battery to make it insulated. You need to take the strip off and re-install the battery for the first-use.
Specification
Type:
Painting Thickness Tester
Measuring Range:
0.00mm - 2.20mm, or 0.0mil - 86.0mil
Measurement Accuracy:
For measurements in “NFe” or “Fe” test mode in which the tester has been properly calibrated: ± 0.05mm
For measurements in auto test mode and on object with aluminum substrate: ± ( 2% of reading + 0.05mm )
For measurements in auto test mode and on object with steel substrate: ± ( 10% of reading + 0.10mm )
Note:The above accuracy specifications assume that the operating temperature is 23º C ± 5º C and the
operating relative humidity is ≤ 75%.
Resolution:
0.01mm/0.1mil
Power Supply:
3V button cell, CR2032 or equivalent, 1 piece
Operating Environment:
0°C~40°C, Relative humidity
Temperature Coefficient:
0.15x(2% of reading ± 0.05mm)/°C(28°C)
Storage Environment:
Temperature:
-10ºC to 50ºC
Relative Humidity:
≤ 80%
Size:
6.9*3.8*2cm
Weight:
About 29g(including button cell)
Operating Instruction
1. Hold the tester and make sure that it is as least 20cm away from the object to be tested and other objects.
Then press the "
TEST
" button to turn on the tester. The display shows all segments and symbols
momentarily. Then it shows the "
AUTO
"
symbol and the measurement unit “
mm
”, and meanwhile, "
",
" ", and "
" appear on the display sequentially and repeatedly.
2. Press the "
" button to select desired measurement unit - mm or mil.
3. After you turn on the tester, it will default to auto test mode and the display will show
"
AUTO
" as an
indication. You can repeatedly hold down the "
" button for about 1 sec to step through "
NFe
" test mode
( "
NFe
" appears as an indication ), "
Fe
" test mode ( "
Fe
" appears as an indication), and back to the auto
test mode ( "
AUTO
" appears as an indication ).
I
f you can not obtain the naked substrate of the object to be measured and have not calibrated the tester
using the naked substrate of this object, you must select auto test mode. The advantage of using auto test
mode is that it is not necessary to calibrate the tester, and the disadvantage is that measurement accuracy in
auto test mode is relatively low.
If you have calibrated the tester using the naked substrate of this object in the "
NFe
" or "
Fe
" test mode,
set the tester in the same test mode ( in which the tester has been calibrated by using the naked substrate of
this object ). The advantage of using
"
NFe
" or "
Fe
" test modes is that measurement accuracy in "
NFe
" or
"
Fe
" test mode is high, and the disadvantage is that the tester must be calibrated in this selected test mode
beforehand by using the naked substrate of this object.
4. Firmly press the tester's probe perpendicularly against the surface of the object to be tested. When the tester
detects a stable reading, this reading will be shown on the display and it is the value of the total thickness of
the
non-magnetic coatings on the
substrate. This reading will be held on the display until the tester turns off
or you make a new measurement. If necessary, you can press the “
TEST
” button to erase this reading and
then test again.
5. If you have not operated the tester about 30 secs, it will turn off automatically. To turn off the tester manually,
hold down the "
TEST
" button for more than 1 sec.
HOW TO CALIBRATE THE TESTER
Before you make measurement in "
NFe
"or "
Fe
" mode, you must make sure that in this mode the tester has
been calibrated by using the naked substrate of the object to be tested or using a naked substrate which is
completely same as the substrate of the object to be tested.
After you finish calibrating the tester in "
NFe
" or "
Fe
" test mode, the tester will save the resulting calibration
data in this test mode automatically. The calibration data will not be lost even when the tester turns off or when
you replace the button cell. But whenever you calibrate the tester again in the same test mode, the already
existing calibration data saved in this test mode will be overwritten by the new calibration data. Thus, only the
lastest calibration data of all calibration data obtained in "
NFe
" mode can be retained in "
NFe
" mode, and
only the lastest calibration data of all calibration data obtained in "
Fe
" mode can be retained in "
Fe
" mode.
Item Specifics
Brand
all-sun
Manufacturer Part Number
allsunEM2271A
Type
Thickness Gauge
Warranty
Yes
Country/Region of Manufacture
China
UPC
788537553694
Measuring Range
0.00mm - 2.20mm, or 0.0mil - 86.0mil
Resolution
0.01mm/0.1mil
Overrange Indication
“ OL ” shown on the display
Power Supply
3V button cell, CR2032 or equivalent, 1 piece
Operating Environment
Temperature: 0ºC to 40º C
Relative Humidity
≤ 80%
Temperature Coefficient
0.15×( 2% of reading±0.05mm)/ºC (28ºC)
Storage Environment
Temperature:-10ºC to 50ºC
Size
6.9×3.8×2cm
Weight
About 29g ( including button cell )
Copyright of XXXX. All rights reserved.
Powered by SoldEazy
On Apr-22-19 at 01:39:25 PDT, seller added the following information:


